
Summary
Choosing new software can be overwhelming for nonprofits. With limited budgets, lean teams, and complex workflows, it’s easy to miss out on tools that could make a real difference.
This guide is here to change that. It offers a clear, practical process for evaluating and selecting the right software—helping your team avoid costly missteps and make confident, mission-aligned decisions.
We’ve also included 118Group’s Software Evaluation Checklist worksheet to aid you through the entire process.
Download the Worksheet that accompanies this article
Use our Google Sheet template to help guide your organization through the software selection process!
Why software selection is SO difficult for nonprofits
Imagine your organization is looking into a new membership management platform. You gather your team and someone mentions a tool they saw online or on another peer websites. Suddenly, your doing demo’s with the product team and you’ve spent hours training and learning the setup.
You only realize later that this tool is a poor fit for your nonprofit’s needs.
This is a common experience, often because the team has skipped two key steps: clarifying what you need and understanding how it fits into your existing ecosystem of tools.
This guide is meant to help..
Step 1 – Map Your Current Software
When it comes to technology, organizations often focus on individual tools and platforms rather than taking a step back to look at the larger picture.
What is a tech ecosystem and why it matters
All the various software and tools your organization uses to operate exist within an ecosystem. This ecosystem can be well-organized, integrated, and highly automated, or it can be disjointed, siloed, and require significant manual involvement.
Before adopting any new piece of technology, your organization should have a clear map of its tech ecosystem. A tech ecosystem map visualizes all the tools your nonprofit is currently using, while also illustrating the relationships these products have to one another.

A tech ecosystem map is essential because:
- A tech ecosystem map can help identify redundancy in products (and therefore budget waste)
- A tech ecosystem map can help identify data walls or data silos
- A tech ecosystem map can help identify opportunities to invest in tools to replace multiple previous products
A proper tech ecosystem map will show where tools are integrated, where they might be siloed, and how data flows from one product to another.
How to create your own tech ecosystem map
Our article written all about mapping your tech ecosystem is a great resource for any nonprofit looking to get a grasp on their sprawling toolset.
Step 2 – Brainstorm Features Based on Real Needs
Following along in the provided worksheet, the first step in selecting the right software product for the job is a Feature Brainstorm. This is meant to be a free and flexible conversation between team members to help bring to the surface some of the key functionality required of your new tool.
It can be helpful to organize this conversation by “Function Areas” such as Payments, People Management, Communications, etc…
Our worksheet provides several function areas to start with.

Additionally, here are a few important questions that may help further kickstart conversations about features.
- What routine tasks take up the most staff or volunteer time right now?
(Example: manually sending renewal reminders, copying spreadsheets, mailing invoices) - Where are we relying on workarounds, such as spreadsheets, shared documents, or email chains?
(This helps uncover hidden systems that could be streamlined with purpose-built tools.) - What’s one thing that regularly gets dropped or delayed because of tool limitations?
(A clue toward friction points that new software should help solve.) - What information do we often need but can’t easily find or report on?
(For example: knowing which members haven’t renewed, or pulling a donation summary.) - What experience do we want for the people interacting with us—members, donors, clients?
(Do they need self-service access, easy signup, or clear communications?) - What’s one thing we’d like to do in the future but feel held back by our current tools?
(Planning for growth or new initiatives.)
Step 3 – Prioritize Your Features
To help you navigate the dozens of products likely available to you, you’ll want to come armed with two key lists:
- Your list of must-have features
- Your list of nice-to-haves
Gather your important stakeholders and, using our worksheet or a simple whiteboard, list all of the features that may be of interest to your team for this new product. This doesn’t need to be sorted or prioritized at this point – it’s just a brain dump.
Next, draft two columns for your team to start sorting features into the two main categories listed above. Your table might look something like this:

There will likely be disagreement between various team members about what belongs in each list.
That’s okay. Disagreement is good.
We can’t list everything as being essential – compromise on certain features will be an essential part of the selection process.
Step 4 – Research and Compare Tools
Now, armed with your ecosystem map and your organized feature list, you’re ready to start evaluating options. There are several ways you can start to build your list of options. Here are a few that work for many nonprofits:
Ask peer organizations what they’re using.
Sending a quick email to a colleague at another organization could save you a ton of time in the product research process.
Ask your web developer or consultant
Typically, your web developer has evaluated and worked with dozens of various products. They’ll likely be able to point you in the right direction.
Use ChatGPT, Perplexity, or Gemini
You can also ask ChatGPT or Perplexity for some recommendations to get started. You might provide it with a simple prompt such as:
“We’re a nonprofit looking to replace our current membership management solution. We are looking for something that (priority 1, priority 2, priority 3). Can you help identify a few options to start with?”
Step 5 – Score Tools Based on Fit
In the worksheet that accompanies this article, you’ll be able to score each potential product based on your priority list of features.
Any feature that you’ve tagged as “Must Have” is worth 2 points.
Any feature that you’ve tagged as “Nice-to-have” is worth 1 point.
Once you’ve tagged each feature to its respective priority level, it will dynamically score the product based on that feature’s availability (see screenshot below)
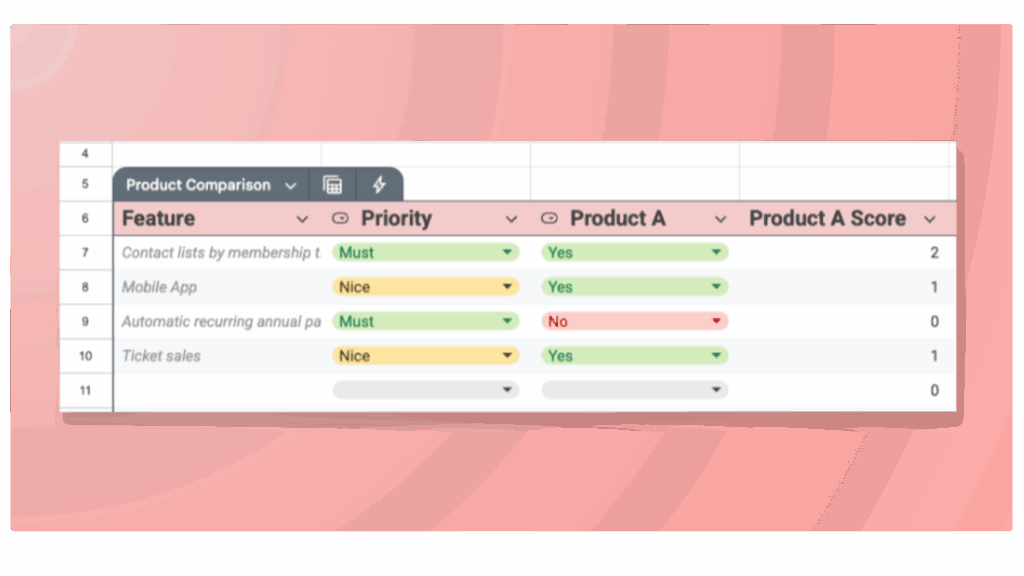
Once you’ve repeated that process for the other Product columns (5 total), you’ll be able to review the scorecard for each product to get closer to a decision.

Don’t Let Price Be the Only Factor
Obviously, price plays an important role in this decision. Nonprofits are very cost-conscious and often start with price and work backwards to make decisions regarding technology.
What is missing from that perspective is the value of the product.
For example, your new membership management product could cost you 2x what your previous solution cost, BUT, it may reduce an hour a week of manual data entry work and is therefore saving you time and money.
Or, your new donation platform costs twice your previous solution, but it converts four times the number of donors with a much better user experience.
It’s critical to move beyond sticker price and to consider how a new product may:
- Increase revenue through better digital experiences for users
- Decrease time spent on manual tasks
Questions?
Feeling overwhelmed by a new software decision? Our team of nonprofit website experts is always available to provide our guidance and help steer your organization towards a solid decision. Reach out today!